Generated Project End-User Documentation
Systems produced by Mike are built from a common set of components. Differences between applications—both in appearance and behavior—come from which components were included, how many instances of each were used, how they were customized, and any additional modifications developers made afterward.
We use a CRM application to illustrate what a Mike application consists of and how to use it. (You can view the Mike descriptor the app was generated from in Generated Project Developer Documentation.)
1.CRM System
The CRM (Customer Relationship Management) system supports a hypothetical company’s customer-relationship workflows.
1.1.User menu
When you open the site, a user menu appears in the top-right corner, represented by a stylized person icon; when you’re signed in, it also shows your username next to the icon (see Figure 1.). Its contents depend on whether you’re signed in. Two entries are always available: “Language” and “Dark mode.” The former sets the UI language; the latter toggles the color theme. After enabling dark mode, the menu item changes to “Light mode” to revert to the original theme. When signed in, a “Sign out” option is also shown.

Figure 1.:User menu icon
1.2.Authentication and authorization
Because customer data is sensitive, the system is only usable after signing in, and signed-in users can perform only those actions they are authorized for. (Mike applications typically include auth, but some tasks—or even entire apps—may be accessible without signing in.) After entering the application URL in your browser, the sign-in page opens. Provide your username and password to continue (see Figure 2.).
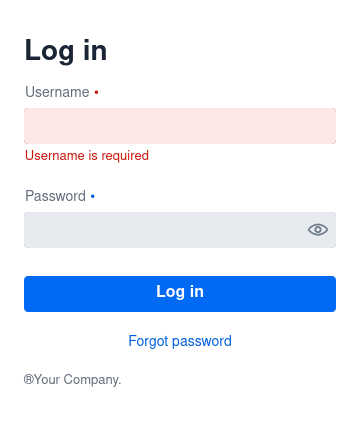
Figure 2.:Login window
Self-registration is not available. New users must be added by an existing user with the appropriate privileges, e.g., an admin.
If a user forgets their password, they can request a new one via the Forgot password link. Enter your username or your registered email address; the system will send an email with further steps (see Figure 3.).
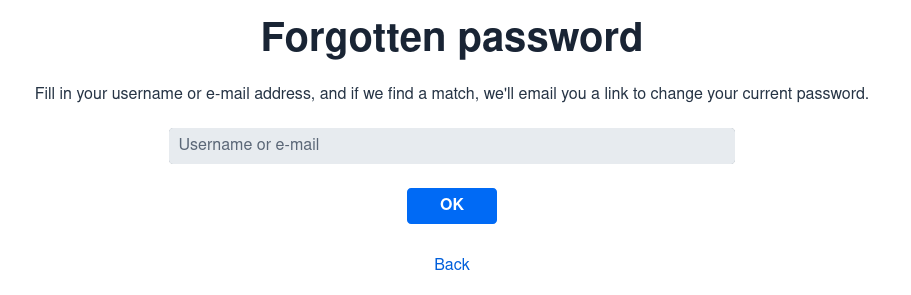
Figure 3.:Request a new password by providing your username or registered email address
That email contains a link that lets you set a new password (see Figure 4.). Enter the new password twice to minimize typos. The page lists password requirements in detail (these can differ by system). Clicking the “eye” icons reveals the typed password—use with care in shared environments.
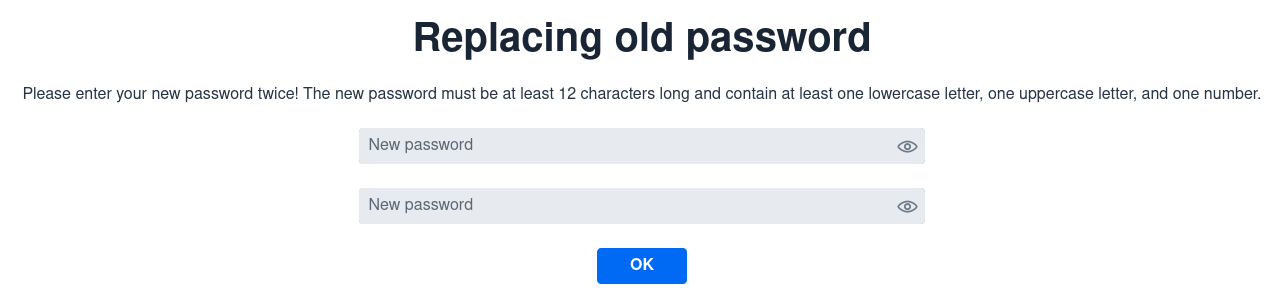
Figure 4.:Setting a new password
Afterwards the browser returns to the sign-in screen, where you can log in with the new password.
1.3.Navigation menu
A left-hand navigation menu appears along the edge of the app (see Figure 5.). You can hide or show it using the “hamburger” icon (three horizontal lines) in the top-left corner.
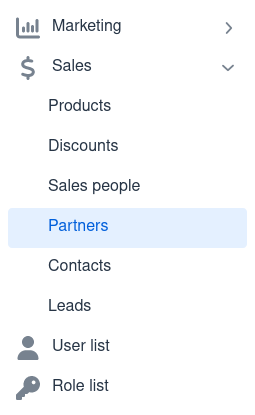
Figure 5.:Navigation menu with the “Sales” group expanded and the “Partners” page open
Below the icon you’ll see a logo and the menu items. Some items go directly to pages (e.g., “User list”); others are groups (e.g., “Marketing”). Click a group name to expand or collapse it. The active page is highlighted.
1.4.Common page layout
1.4.1.Tables
Pages reachable from the navigation menu present data in tabular form with a common structure.
If defined, the page title appears at the top in larger bold type (see Figure 6.).
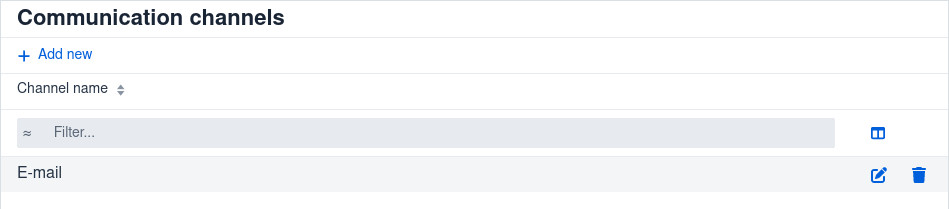
Figure 6.:The “Communication channels” page
Next comes + Add new, which creates a new record that will be saved to the database.
The next row contains the column headers (see Figure 7.). Click a header to change the sort direction (ascending, descending, or natural order). Small triangles next to the header show the current direction. If multiple columns are involved, each can have its own sort; tiny numbers to the right of the triangles show the priority of each sort key.

Figure 7.:Sorting ascending by partner, then by name
Reorder columns by dragging and dropping their headers.
You can filter rows by the value of one or more fields. Available filters depend on the field type. For text fields, choose among the options shown in Figure 8.. Open the filter menu by clicking the icon at the left edge of the filter input; it reflects the currently selected mode.

Figure 8.:Filtering a text field
For numeric fields, appropriate relational operators are available (see Figure 9.).
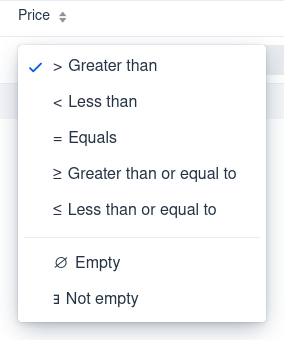
Figure 9.:Filtering numeric values
For enumerations (pick-one lists), the options are correspondingly limited (see Figure 10.).
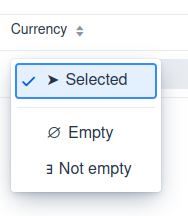
Figure 10.:Filtering enumerated values
Finally, date/time fields support the filters shown in Figure 11..
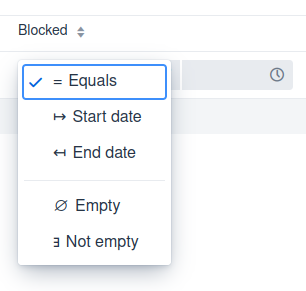
Figure 11.:Filtering date and time values
On most pages you can adjust column widths by dragging the gutter between filters; a blue vertical guide appears (see Figure 12.). This works even if filtering is disabled and the filter inputs are hidden.
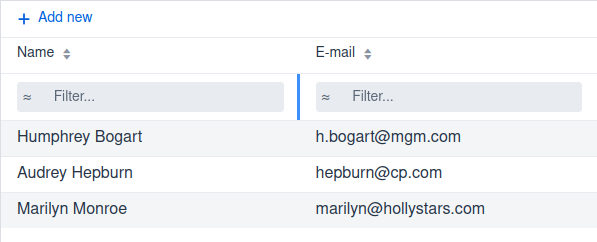
Figure 12.:Adjusting column widths
Two icons may appear to the right of the filters. The first shows two side-by-side columns (see Figure 13.); click it to choose which columns are visible.

Figure 13.:Configuring visible columns
The second toggles display of inactive entries (see Figure 14.). In some tables, records can be inactivated instead of permanently deleted. Inactive rows are hidden by default but remain in the database; you can reveal them, and they appear with a highlighted background. If the activity field is visible, it will show that the item is inactive and, depending on configuration, the date it was inactivated.
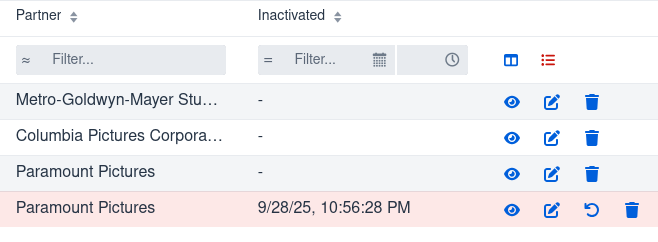
Figure 14.:Show inactive entries
Use the trash-can icon at the far right of a row, ![]() , to delete or (where allowed) inactivate a record. The confirmation dialog (see Figure 15.) offers both options when possible.
, to delete or (where allowed) inactivate a record. The confirmation dialog (see Figure 15.) offers both options when possible.
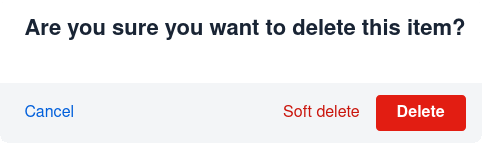
Figure 15.:Delete dialog
1.4.2.Adding new records
On tabular pages, the + Add new link above the table opens an entry form for the same type of records shown in the list.
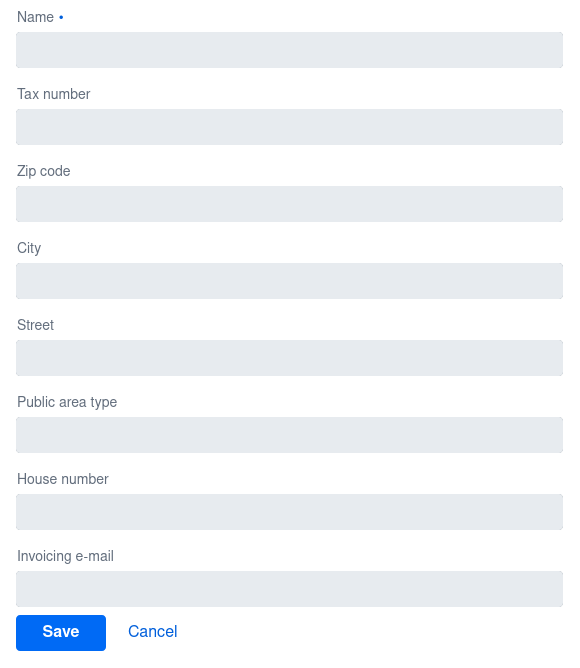
Figure 16.:Add a new partner
1.4.3.Editing records
To edit a row, click the pencil icon at the far right, ![]() . This opens the same form used to create records, prefilled with current values, and includes a button to delete the record.
. This opens the same form used to create records, prefilled with current values, and includes a button to delete the record.
1.4.4.Viewing records
Click the magnifying-glass icon, ![]() , to open a read-only detail view. Its layout depends on the specific data.
, to open a read-only detail view. Its layout depends on the specific data.
1.5.Application pages
1.5.1.Communication channels
Manage channels used for contacting customers. Although presented in a table, there is just one column: the channel name. No additional details are available and items cannot be inactivated.
1.5.2.Marketing channels
This page also has a single column—the channel name—but the View action is available. It opens another table for compiling the channel’s budget.

Figure 17.:Marketing channel view: assembling the budget
1.5.3.Products
Lists products. More fields are stored (recurrence, invoice-time value, VAT rate, notes) than are shown in the table (name, price, currency).
1.5.4.Discounts
Lists discounts, each with a name, type (percentage or fixed amount), and value.
1.5.5.Sales representatives
The table shows only the salesperson’s name, but the View action displays their leads in a table (see Figure 18.). That view’s View action links to the same lead-detail view used on the Leads page (see Figure 20.).
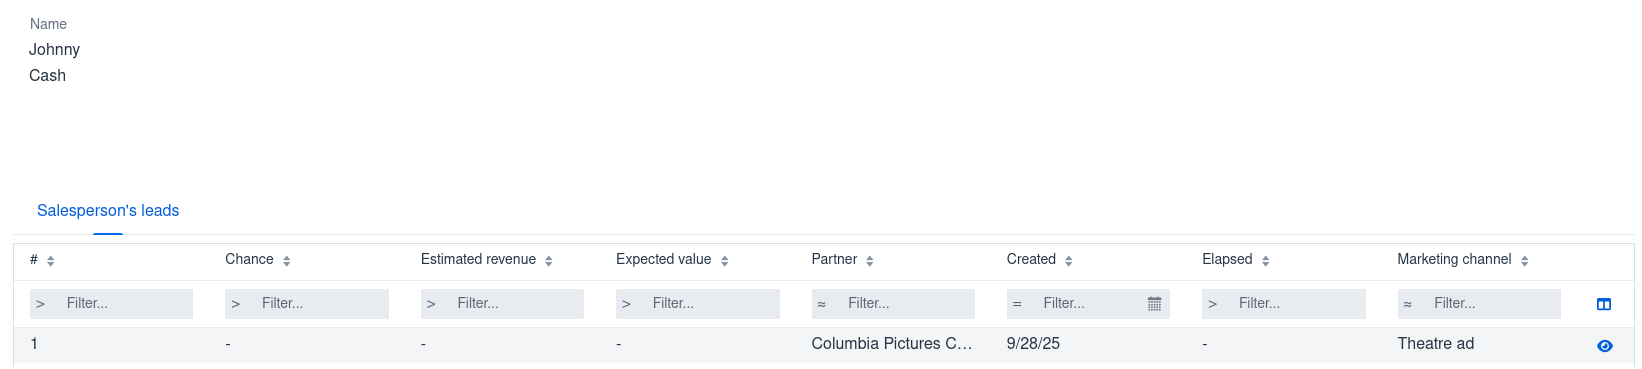
Figure 18.:Leads assigned to a salesperson
1.5.6.Partners
Shows partner data: name, postal address, and tax number. The database also records the VAT ID and billing email address. The detail view additionally lists the partner’s contacts and company-size metrics (year, revenue, profit, headcount) (see Figure 19.).
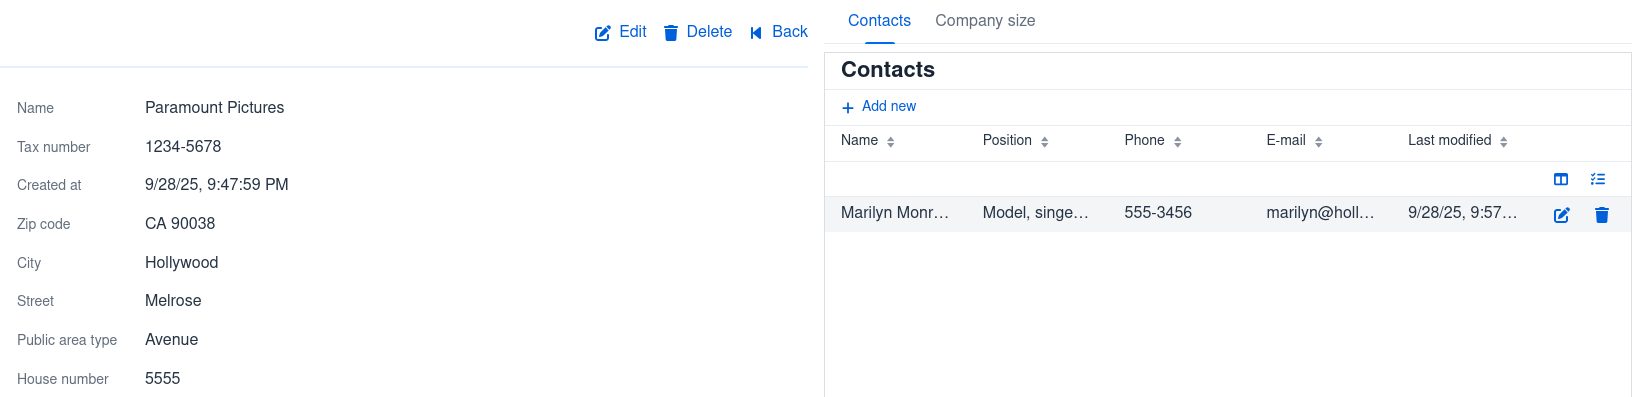
Figure 19.:Partner details
1.5.7.Contacts
Manage contacts associated with partners. The system stores name, email address, phone number, and job title.
1.5.8.Leads
Displays selected lead attributes: sequence number, probability, associated partner, salesperson, creation date, and marketing channel. You can optionally show estimated revenue, expected value, and duration. Editing and deletion are disabled, but the View action opens a two-band detail page (see Figure 20.).
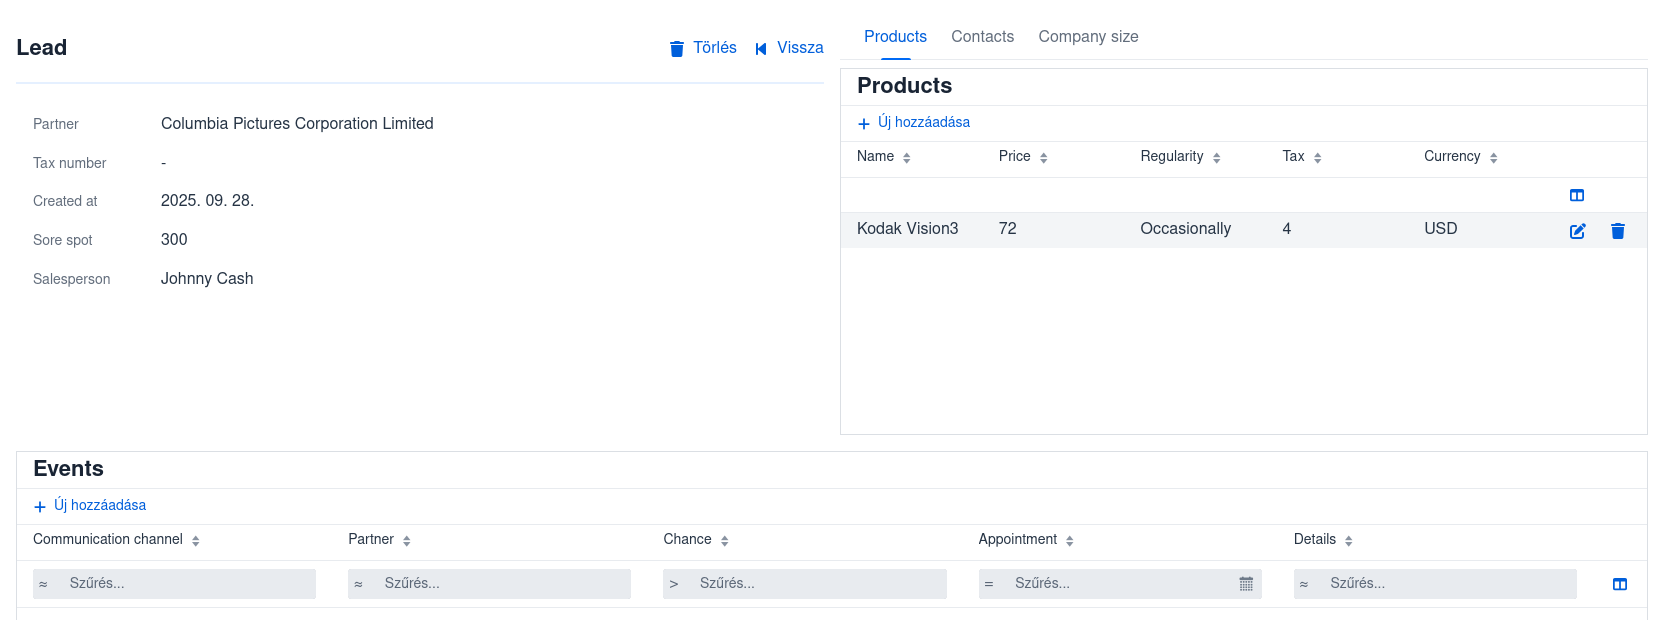
Figure 20.:Lead details
The upper band has two parts: on the left, key lead fields; on the right, a tabbed panel where you can review and edit products, contacts, and company-size data in tables. The lower band manages event data.
1.5.9.Users and roles
If the web app includes user management—as it does in the CRM—two related menu items appear: Users and Roles.
Users. Initially you’ll see a single user, the admin, in the familiar table view. By default the admin has all privileges and can invite additional users via + Invite new user, view user details, and edit them. The system stores each user’s unique username and email address, plus real name, assigned roles (a user can hold multiple roles), and—if a user is blocked (temporarily banned)—the date of blocking. Users cannot be deleted, only blocked. The system ensures that at least one admin-privileged user always remains active to unblock others or add new users.
Roles. This page manages the set of roles assignable to users. A role is a named collection of privileges with an expressive name and a unique identifier (a string starting with ROLE_). Privileges fall into four categories: create (CREATE_), delete (DELETE_), update (UPDATE_), and read (READ_). Privileges are defined per entity type stored in the database; for example, CREATE_PARTNER, DELETE_PARTNER, UPDATE_PARTNER, and READ_PARTNER are used to govern partner management.
You can delete a role only if no user currently has it. To remove a role, first unassign it from all users.
The privileges belonging to a role are editable—for example, you can remove specific privileges from a role. The built-in admin role is special: it can’t be deleted nor can any of its privileges be removed.